

Creating valuations
You can create a valuation from the column view or the table view using the New Job button in the top right-hand corner of the page.

When you click this button, you'll see a menu prompting you to choose to create a valuation or a project.
Projects are collections of multiple valuations.
Once you choose to create a valuation, the new valuation will be opened for editing.
The job form is a fullscreen popup, not a new page. You can exit the popup using the Close![]() button at the top left of the screen, or hitting the Esc key.
button at the top left of the screen, or hitting the Esc key.
Overview
You don't need to do enter much to create a job, but there are a few basic steps you should follow to ensure that a job is properly filled out:
- Click the New job button described above and select Valuation.
- Fill out the Details | Address panel.
- Add contacts to the job using the Details | Contacts panel.
- If a contact other than the instructing party is going to be paying the invoice, edit them and tick Bill to to ensure the invoice will be addressed to them.
- Enter the Report fee (ex. GST) in the Details | Invoices panel.
- GST will be added when the invoice is created.
- Fill out the important bits in the File tab:
- Valuer and Category in the File | Valuation information panel.
- Property type in the File | Property details panel.
- Report purpose in the File | Valuation type panel.
- Save the job.
The valuation is now officially created, but there are some more things you may want to do before leaving it alone.
- Add a workflow from the Workflow panel at the side of the screen.
- Add an invoice in the Details | Invoices panel.
- Fill out as much of the rest of the valuation form as you please. Notable sections include the Attachments tab and the Sales evidence tab.
- Save and close the job.
That's all you need to start off a job in the system. Keep reading to get an unpacking of each step.
Filling out the form
The valuation form comprises several tabs, each of which holds a group of panels with data input fields.
To add information to a valuation, you should work through these tabs and fill out information as you can.
Refer to working with valuations for a full explanation of the valuation form.
To create a valuation, you don't need to fill out any data - it can be saved straight away. But the job won't have any meaning until you start adding information.
The most important things to fill out at job creation are in the Details and File tabs.
Details tab
The details tab is the first tab in the valuation form, and contains most of the defining information about the valuation, including address details, contacts, and reference numbers.
Valuation details
This panel contains information about the job itself, the most important field being the Job ref, short for job reference number. This is the job's ID, and will be automatically populated after you create the job. Leave it blank.
The Job name is an optional field that can be used to identify the job internally where the address isn't particularly meaningful, or doesn't refer to a typical property. If you provide a job name, that will show throughout the system instead of the address.
Address details
Click the Search button on the address panel to show the address lookup popup.
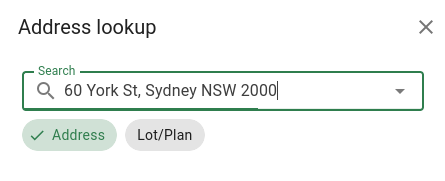
Type the address you want to find, then select the address you want, or hit enter. The address information will be populated for you if it’s available.
If we can't find the address that you want, you’ll need to manually enter the address details.
Contacts
To add a contact to the job, click the add contact button in the Details | Contacts panel.
This will open a popup for you to search the system for an existing contact.
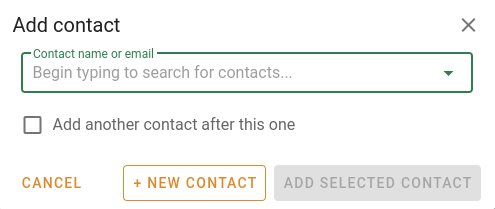
Begin typing in the lookup field to search in the system for a contact by name or email address.
Any contact in the system that matches will be shown in a dropdown for you to select. Select the contact you want, then click Add selected contact.
If your contact isn't there, you can use the New contact button to create a new client.
To add multiple contacts to the job at a time, tick Add another contact after this one before you confirm your selection.
You further edit the contacts on the job after you've added them to set information like their job reference, and the role the fill on the job.
File tab
The file tab is where you can enter general information about the job, as well as assign the valuer that the job is assigned to. The category, property type and report purpose are important for running job reports and searches.
Save the job
You should save the job early and often, after entering address, client, and valuer information. The first time you save a job, the job is created in the database and the job number is generated.
You won't be able to create invoices, add workflows, or upload attachments until after you save a job for the first time.
Invoices
Invoices are accessed through the Details tab. Before adding an invoice, you should fill in the Report fee (ex. GST) field. Once the report fee has been filled in, you'll be able to use the Auto invoice button.

The auto invoice button will automatically create an invoice for the full report fee, and bill it to the first client.
You can also manually create an invoice using the + Add invoice button.

Adding an invoice this way will bring up the invoice form, which will allow you to select the contact to bill to, add notes, change amounts, or break up the fee into an itemised invoice.